ColorLab
A full Camera Raw style finishing stage in a single node: white balance, exposure and tone, per-colour HSL, three-way colour grading with colour wheels and a black-and-white mixer. Every control starts at neutral, and the settings can be passed on as a preset.
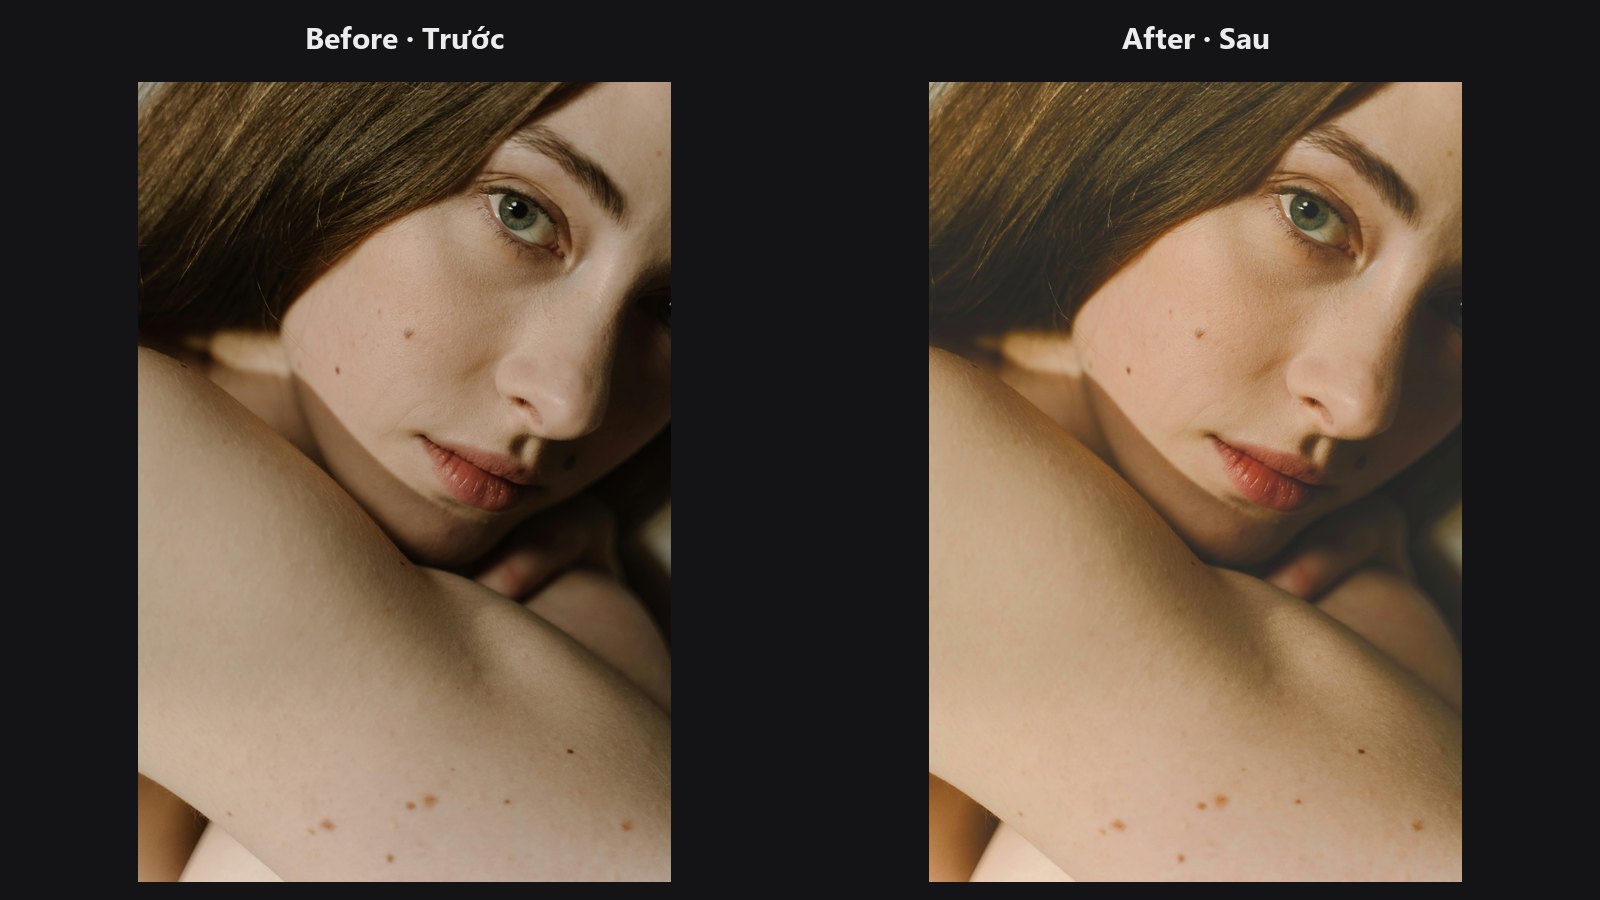
| In ComfyUI | Add Node → ComfyUI-JH-PixelPro → color → Color: ColorLab (ACR) |
| Good for | A quick global grade, teal-and-orange looks, split toning, black-and-white conversion, one-node finishing after retouching, grading once and reusing the look on other photos |
| Speed | With tone_engine set to local, a 4K image takes about 0.2 s on the GPU with a peak of about 1.56 GB. |
When to use it
If you know Lightroom or Camera Raw, you already know this node. Instead of chaining many small nodes, you get the same panels in the same order, applied as one pipeline: White balance → Basic → HSL → Color Grading → B&W (Gray Mix). It is a good final step after the heavy retouching is done, or a stand-in for a Camera Raw pass on a generated image.
It is an approximation written for this pack, not Adobe's code, so numbers will not match Camera Raw one-to-one. Judge by eye. With every slider at 0 and B&W off, the image passes through untouched.
The node has 59 controls plus an optional params_json input. Their names tell you the panel: basic_*, wb_*, hsl_*, grade_*, gray_*.
The tabbed panel
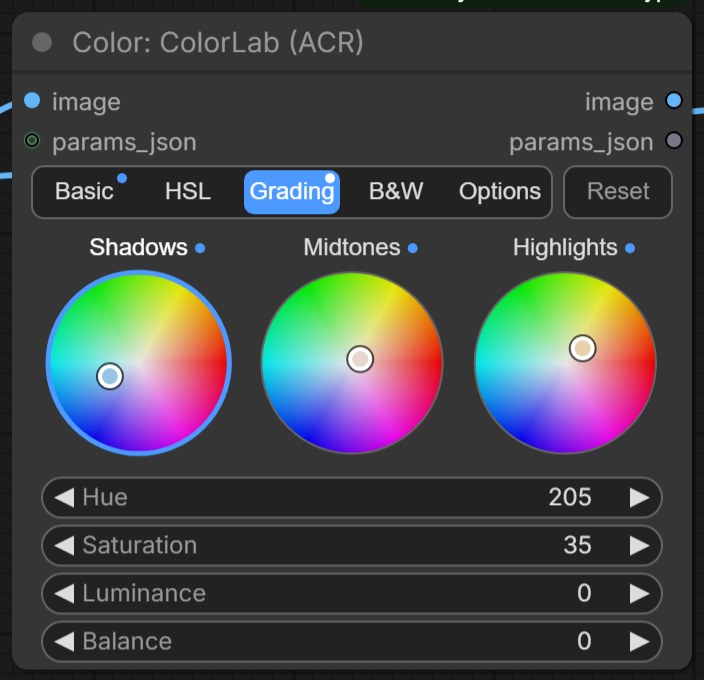
To keep the node short, the controls are grouped in tabs: Basic, HSL, Grading, B&W and Options.
- Basic holds the Light and Presence sliders, plus Temp and Tint under White balance.
- HSL shows a row of 8 colour dots. Click a dot to pick a colour; its Hue, Saturation and Luminance sliders appear below.
- Grading shows three Lightroom-style wheels for Shadows, Midtones and Highlights. Drag inside a wheel: the angle sets the hue, the distance from the centre sets the saturation. Click the centre for no tint. Below the wheels you get Hue, Saturation, Luminance and Balance sliders for the selected region.
- B&W holds Convert to B&W and the per-colour gray mix sliders.
- Options holds
exposure_modeandtone_engine. - A small blue dot marks every tab (and every HSL colour or grading wheel) that has edits.
- Reset sets the open tab back to neutral. On HSL and Grading it only resets the colour or region you are looking at.
Workflows saved before the tabs existed open on the first tab that has edits. The tabs only change the display: the values saved in your workflow and sent in API prompts are exactly the same as before. If you use ComfyUI's Vue nodes mode, the node shows the plain list of sliders instead.
Quick start
- Load Image → ColorLab → Preview Image.
- On the Basic tab, nudge Exposure and Contrast, then Highlights and Shadows. Fix a colour cast with Temp and Tint.
- For colour, move on to HSL or Grading. Change one tab at a time and compare against the original.
- For black and white, open B&W, turn on Convert to B&W and shape the tones with the colour sliders.
- Want highlights and shadows that behave more like Lightroom? On Options, set
tone_enginetolocal.
Settings
All sliders default to 0, except where noted. "±100" means the slider runs from -100 to 100.
Basic
Global tone and presence (the Basic tab).
| Setting | Range | What it does |
|---|---|---|
basic_exposure |
-5 to 5 (stops) | Overall brightness. Each +1 doubles the light. |
basic_contrast |
±100 | Spreads tones away from mid-grey. With the local engine it is an S-curve that keeps pure black and pure white in place. |
basic_highlights |
±100 | Brightens or recovers the bright half of the picture. |
basic_shadows |
±100 | Opens up or deepens the dark half. |
basic_whites |
±100 | Moves the very brightest tones. |
basic_blacks |
±100 | Moves the very darkest tones. |
basic_texture |
±100 | Fine-detail punch (small radius). |
basic_clarity |
±100 | Mid-tone local contrast (larger radius), strongest in the mid-tones. |
basic_dehaze |
±100 | Cuts haze; negative adds a soft haze. |
basic_vibrance |
±100 | Boosts weak colours more than strong ones and protects skin tones. |
basic_saturation |
±100 | Scales all colours equally. |
White balance
Shown as Temp and Tint on the Basic tab. Both are optional and relative: they shift the colour of the picture you already have, they are not Kelvin values.
| Setting | Range | What it does |
|---|---|---|
wb_temperature |
±100 | Warmer (+) or cooler (-). |
wb_tint |
±100 | Magenta (+) or green (-). |
Brightness is kept while the colour shifts, so a white balance change does not make the picture lighter or darker.
HSL
Eight colour bands: red, orange, yellow, green, aqua, blue, purple, magenta. Each has three sliders named hsl_<colour>_hue, hsl_<colour>_sat and hsl_<colour>_lum, all ±100 (24 in total, e.g. hsl_orange_sat). On the HSL tab, pick the colour with its dot.
| Slider | What it does |
|---|---|
hsl_<colour>_hue |
Rotates that colour toward its neighbours (up to about 30 degrees at the extremes). |
hsl_<colour>_sat |
Makes that colour stronger or weaker. |
hsl_<colour>_lum |
Makes that colour lighter or darker. |
Bands overlap softly, so neighbouring colours move a little with the one you edit. This is the panel for teal-and-orange, greener foliage or calmer skin reds.
Color Grading
Three tonal ranges: shadow, mid, highlight. Each has four sliders, named grade_<range>_hue, grade_<range>_sat, grade_<range>_lum and grade_<range>_bal (12 in total, e.g. grade_shadow_hue). On the Grading tab, the wheels set hue and sat for you.
| Slider | Range | What it does |
|---|---|---|
grade_<range>_hue |
0 to 360 | The tint colour, as a position on the colour wheel. |
grade_<range>_sat |
0 to 100 | How strong the tint is. The tint only appears when this is above 0. |
grade_<range>_lum |
±100 | Lightens or darkens that tonal range. |
grade_<range>_bal |
±100 | Treats pixels as brighter (positive) or darker (negative) when deciding which range they belong to. Positive shrinks the shadow range and widens the highlight range. |
Set hue first, then raise sat slowly. A touch of blue in the shadows and warm yellow in the highlights is the classic split-tone.
Gray Mix (B&W)
Black-and-white conversion with per-colour control (the B&W tab).
| Setting | Default | Range | What it does |
|---|---|---|---|
gray_enable |
off | on / off | Converts the image to grey (Convert to B&W). Nothing in this panel applies while it is off. |
gray_red, gray_orange, gray_yellow, gray_green, gray_aqua, gray_blue, gray_purple |
0 | -200 to 300 | How light each colour appears in the grey result. Positive lightens that colour, negative darkens it. |
There is no gray_magenta slider: magenta follows its neighbours unless a preset sets it (see below).
Options
| Setting | Default | What it does |
|---|---|---|
exposure_mode (optional) |
display |
display multiplies the picture values by 2^EV (the classic ColorLab behaviour). linear converts to linear light first, multiplies, then converts back, like a camera or Lightroom. |
tone_engine (optional) |
legacy |
legacy keeps the behaviour of earlier versions. local makes Highlights and Shadows edge-aware (they follow the shapes in the picture instead of shifting whole tonal bands), uses an edge-aware Clarity, a dark-channel Dehaze and a Contrast S-curve that keeps black and white. It runs on the GPU when one is available. |
The params_json input
params_json (optional, connection only) takes ColorLab settings as text, for example from Color: Lightroom Preset (XMP) or from another ColorLab's params_json output.
- Numbers are added to the sliders. The preset sets the starting point and the sliders on this node fine-tune it: a preset with Exposure 0.5 plus a slider at 0.2 gives 0.7.
- On/off switches and text settings (
gray_enable,exposure_mode,tone_engine) replace the node's value. - Unknown names are ignored with a warning in the console. Text that is not a valid JSON object stops the run with an error.
Settings that only come from params_json
These settings have no slider. They arrive through params_json, usually from a Lightroom preset or from a preset saved from ColorLab.
| Setting | Values | What it does |
|---|---|---|
tone_curve |
list of [x, y] points, 0 to 255 |
Point curve on all channels, like Lightroom's Point Curve. |
tone_curve_red, tone_curve_green, tone_curve_blue |
list of [x, y] points, 0 to 255 |
Point curve on one channel. Curves need at least two points with different x. |
calib_red_hue, calib_red_sat, calib_green_hue, calib_green_sat, calib_blue_hue, calib_blue_sat, calib_shadow_tint |
±100 | Calibration panel: shifts the hue and saturation of the red, green and blue primaries, and the green/magenta tint of the deep shadows. |
vignette_amount, vignette_midpoint, vignette_feather, vignette_roundness |
amount ±100 (negative darkens the corners) | Post-crop vignette. Midpoint, feather and roundness default to 50, 50 and 0. |
grain_amount, grain_size, grain_frequency |
amount 0 to 100 | Film grain on brightness. Size and roughness default to 25 and 50. The grain pattern is the same on every run. |
gray_magenta |
-200 to 300 | Magenta slider of the B&W mix. When it is not set, magenta follows its neighbours. |
Outputs
| Output | What it is |
|---|---|
image |
The adjusted picture. |
params_json |
This node's settings as a preset: only the values that differ from neutral, including anything that came in through params_json. Connect it to another ColorLab's params_json or to Apply ColorLab Preset. |
Tips from retouching
- For natural exposure moves, set
exposure_modetolinear. Real light adds up in linear space, so +1 stop behaves like opening the camera aperture one stop: mid-grey 0.5 goes to about 0.69, highlights roll off gradually and colours keep their balance.displaymultiplies the stored values instead, so the same +1 sends mid-grey to 1.0 and clips bright areas quickly. Old workflows stay ondisplay. - Recovering a bright sky or opening a backlit face? Try
tone_engine=local. The legacy engine lifts or pulls whole tonal bands, which can flatten the picture; the local engine works around edges, so detail and local contrast survive. - Work top to bottom: white balance and tone in Basic first, colour in HSL or Grading afterwards, so the colour edits sit on a stable base.
- Use small steps. Many sliders act strongly near their ends; 10 to 30 is often plenty.
- Skin mostly sits in the orange band. Move
hsl_orange_*gently and shift blues and greens harder when you want a look without sickly skin. - For black and white, darken
gray_blueto deepen skies, lightengray_orangeandgray_redto smooth skin. - Grade one hero shot, then send its
params_jsonto Apply ColorLab Preset to give a whole batch the same look. - When you chain two ColorLab nodes, connect either the image or the
params_jsonfrom the first one, not both. Feeding both applies the grade twice. - ColorLab affects the whole frame. To grade only part of it, blend the result back through a mask (see Luminosity Masking), or use the
maskinput of Apply ColorLab Preset. - Want only local contrast? CLAHE Local Contrast lifts flat or dark regions in a different way than
basic_clarity.
Under the hood
The pipeline lives in core/color_lab.py and uses plain PyTorch plus Kornia. Input is clamped to 0..1. The order is: white balance → calibration → Basic → point curves → HSL → Color Grading → Gray Mix → vignette → grain.
- White balance: in linear light, red is scaled by
1 + 0.3·temp, green by1 - 0.22·tint, blue by1 - 0.3·temp, then the result is rescaled to the original luminance (Rec. 709). - Calibration: a 3×3 linear-RGB matrix that rotates the hue and scales the chroma of each primary in OkLCh while keeping white fixed; Shadows Tint changes green in the deep shadows with luminance kept.
- Basic,
legacyengine: exposure multiplies by2^exposure(display, on the sRGB values) or converts to linear RGB with Kornia, multiplies by2^exposure, clamps and converts back (linear; mid-grey 0.5 at +1 EV becomes about 0.686); contrast pivots around 0.5; highlights, shadows, whites and blacks add smoothstep-weighted offsets driven by luma (Rec. 601 weights) and are range-protected so they do not clip; texture and clarity are unsharp-style boosts using a 5 px and a 9 px box blur with replicated borders (clarity is weighted toward the mid-tones); dehaze is a contrast and offset change; vibrance and saturation work in HSV, with vibrance down-weighted near the skin hue. - Basic,
localengine: dehaze runs first, with a dark-channel prior (He et al. 2009) and an airlight estimated from a 512 px proxy; contrast is the S-curvex - a·sin(2πx)/2π(black and white fixed); highlights and shadows use a local Laplacian filter; clarity boosts a band of log luminance split off with a guided filter, weighted to the mid-tones. Whites, blacks, texture, vibrance and saturation are the same as inlegacy. When the image is on the CPU and a CUDA GPU is available, the pipeline moves to the GPU and back; if the GPU runs out of memory it falls back to the CPU. - Point curves: monotone cubic (Fritsch-Carlson) curves, flat beyond the end points; the master curve first, then the per-channel curves.
- HSL: each band is a Gaussian on the hue circle (sigma 20 degrees) around fixed anchors: red 0, orange 30, yellow 60, green 120, aqua 180, blue 240, purple 280, magenta 310.
- Color Grading: each range uses a smooth luma mask (shifted by
bal), a tint built fromhueandsat, andlumas a lift. - Gray Mix: luma is modulated by the per-band weights; magenta only joins when
gray_magentais set. - Vignette and grain run last, in Lightroom's order. Grain uses a fixed seed.
The result is passed through nan_to_num and clamped to 0..1. If all settings are neutral and gray_enable is off, the input is returned as is. With the new inputs left at their defaults the output is the same as in earlier versions.
Related nodes
- Apply ColorLab Preset: apply ColorLab settings to other images, with a strength slider and a mask
- Lightroom Preset: load a Lightroom or Camera Raw preset as ColorLab settings
- Tone Curve: precise contrast shaping with curves
- Hue/Saturation per Range: a single, adjustable hue band
- CLAHE Local Contrast: adaptive local contrast on lightness only
- Luminosity Masking: grade only shadows, midtones or highlights
- LUT Preset: apply a ready-made look after grading
Example workflow
Sample workflows (copy workflows/sample_portrait.jpg into ComfyUI/input/ first):
- ColorLab Basic example workflow
- ColorLab HSL teal-orange example workflow
- ColorLab Color Grading example workflow
- ColorLab Gray Mix example workflow
- ColorLab full preset example workflow
- Apply ColorLab Preset example workflow: ColorLab's
params_jsondrives Apply ColorLab Preset at half strength